
Girl Tank Top - Perfect For Summer's Cool Off
This Summer tank is knitted with hand-dyed cotton/bamboo yarn. It is knitted in rounds from bottom to top. Then I added a long band for front neck and cross back. It has no side seem. It’s very light, cool and comfy.
I knitted this girl tank top for my daughter who just turned 6 and she wears size 6. It’s a loose fit top and it will probably still fit her when she is 7 or 8.
Click Here to get this pattern in a PDF file.

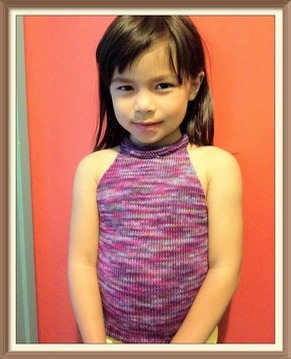
When I first thought about this tank top pattern, I wanted to have a tie on the back of the neck instead of buttons like this one. I found that the back is much more looser than I expect and it wouldn’t stay up very well on its own. The buttons were my other option to keep the back of the tank from sacking. Anchalee, my daughter picked out her own buttons at Joanne’s Fabric. She told me she doesn’t want her button to get washed because they are hand-painted!
Skill level: Easy
Sized: To fit girls size 6-8. Bust size: 23-26 inches. Length : front = 13 inches, Back = 8 inches.
Gauge: 5.5 sts/inches on US size #6 circular needle
Materials:
1. 100 g Sport or DK yarn of your choice(e.g. cotton, bamboo, rayon) Use appropriate needle to maintain same gauge.
2. 16 - 24 inch circular needle US size # 6 (4 mm)
3. Two cute buttons
4. Tapestry needle
5. Stitch marker
Direction For Girl Tank Top:
Cast on 148 sts. Place marker. Join yarn and work in round. Work k2, p2 rib for 1 inch. Knit until piece measure 7 inches from cast on.
Ribbing for back:
Next round: K 76, * [p2, k2] repeat from * to end of round.
Next round: K 76, * [p2tog, k2] repeat from * to end of round.
Next round: K 76, * [p1, k2], repeat from * to end of round. Repeat the last round 3 more times.
Next round: K 74, Bind off ribbing stitches knitwise and purlwise accordingly until end of the round.
Front decrease:
Work on remaining 74 stitches for front and decrease as follows;
Bind off 3 sts at beginning of next two row. Work Stockinette stitch (k on right side, p on wrong side) for 3 row. Do decrease rows as follow;
Row 1: sl 1, ssk (slip, slip, knit) twice, k to last 5 sts, [k2tog] twice, k1.
Row 2: purl.
Row 3: knit.
Row 4: purl.
Repeat these 4 rows 7 more times (or until you have 36 sts remaining)
Next row (right side): K 15, bind off 6 sts in the center, K 15.
Next row: P 15. Turn work and working on right side of front only.
Next row: Bind off 5 sts, k to the end.
Next row: Purl. Turn work.
Next row: Bind off 5 sts, k to the end.
Next row: Purl.
Next row: Bind off all sts.
Attach yarn at the beginning of row on the left side of front and work decreasing row as follow;
Next row (right side): K 15.
Next row: Bind off 5 sts. P to the end.
Next row: Knit.
Next row: Bind off 5 sts. P to the end.
Next row: Knit.
Next row: Bind off all sts
Crochet Edge (optional): You can do single crochet along the front and back edges if you like to make it look neater. I didn’t do mine.
Neck/back cross band:
I make button holes at each ends of my neck/back band. I found out later that my daughter can easily put on this tank top without having to unbutton it. So all you have to do for the band is just Cast on 125 sts and knit all row for about an inch or so. Then bind off all stitches. Sew center of the band to the neck. Then cross the two ends of the band over one another at the back and sew them to the top edge of the back where appropriate. Add couple cute buttons to it and you’re done!
* * * The end of Girl Tank Top Pattern * * *
Knitting Abbreviations Used In This Pattern
K = knit
P = purl
K2tog = knit 2 sts together
P2tog = purl 2 sts together
SSK = Slip 2 sts on to right needle one stitch at a time, then knit the two together
Leave Girl Tank Top To Home Page
Free And Sale Patterns


Recent Articles
-
Top down shawl pointed cast off
Apr 04, 25 02:08 PM
Hi I'm knitting a top down shawl almost like large hole lace it contains yo k2tog in repeat then knit a row once to length its cast off but I want to add
