Voliere yarns from Knit Picks

How do I join a 3 piece hood together?

by Sharon
(UK)
hood
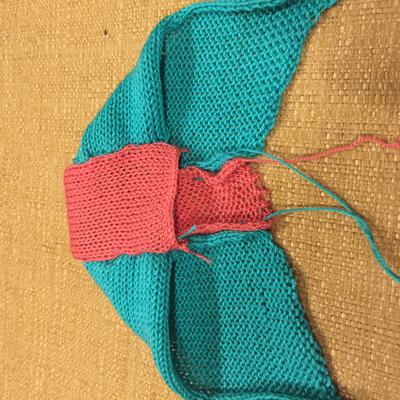
hood


Hi, I'm hoping you can help. I'm knitting a duffle coat for my grandson, and although I've been knitting for over forty years, I can not for the life of me, work out how to sew the hood together! It's made up of three pieces, two side panels and a centre back panel. It tells you to join the centre panel to the two sides, extending the centre panel along the top of the two sides.

Thank you

Sharon

Comments for How do I join a 3 piece hood together?

Average Rating starstarstarstarstar

Click here to add your own comments

Dec 05, 2019
Rating
starstarstarstarstar
A quick video of how I join the hood pieces together
by: Ratchadawan

Hi Sharon,

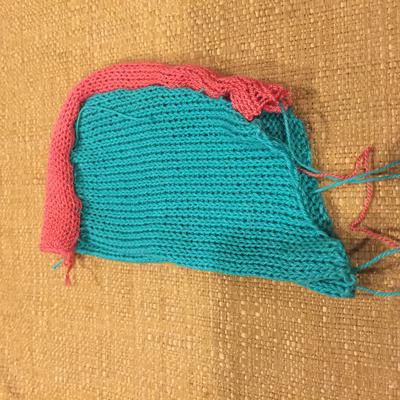
I got curious of how your hood looks like. So I made a quick miniature sample of the 3 hood pieces. I messed up a few rows on each pieces but it was workable. I didn't quite know for sure how to make the center piece at the right proportion but had to guess.

Anyway, you can watch the video below and I hope it will help you complete your hood.

Here it is;


Ratcha

Dec 05, 2019
Rating
starstarstarstarstar
Joining 3 piece hood
by: Ratchadawan

Hello Sharon,

Yes, I see that your hood pieces are not rectangle! It is a similar concept though but your middle piece is going to stick out further so that it can fold down to cover the top of the hood.

You attach the right side of the hood with the center first, starting from the bottom sides of both pieces. Fold the center to match the top of the right side panel and seam them together. It's good to have them blast together first so that you know they are matched nicely. Do the same thing with the other side panel.

I hope this makes sense. I'll try again if this is not helping.

Have a wonderful day!

Ratcha

Dec 03, 2019
Rating
starstarstarstarstar
Reply to your answer to my question
by: Sharon

Hi Ratcha, thank you for your reply, which I actually thought was quick lol. Unfortunately my pieces aren't rectangular, and the centre piece is 36cm long! I'll type out the instructions below, and hope you can decipher it x
Cast on 7 stitches. work 2 rows in st st. Cont in patt as given for back, casting on 7 sts at beg of next row, 5 sts at foll alt row, 3 sts at beg of foll alt row and 2 sts at foll alt row. 24 sts. Inc 1 st at shaped edge on every foll 6th row until there are 29 sts. Work 5 rows without shaping. Dec 1 st at shaped edge on next and foll 2 alt rows, then dec 1 st at shaped edge on next row, so ending with a WS row. Cast off 5 sts at beg of next row and 4 sts at beg of foll alt row. Cast of remaining sts. Work other side to match, reversing shapings.
Centre back panel. Cast on 11 sts. Work in patt, inc 1 st at each end of 9th and every foll 8th row till there are 21 sts. Cont without shaping until 36cm long, ending with a WS row. Cast off loosely. Join centre panel to 2 side panels, extending centre panel along top of side panels.
Thank you for your patience, I hope that you can help.
Sharon x

Dec 01, 2019
Rating
starstarstarstarstar
How to sew 3 hood pieces to the sweater
by: Ratchadawan

Hello Sharon,

Thank you for sharing your question with us. Sorry for the late reply. The Thanksgiving holiday was in the way.

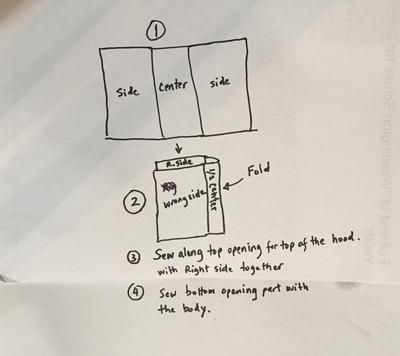
I drew a little diagram for the hood. I hope it will help you some.

The diagram shows different steps of how the 3 pieces are connected in one big rectangle piece. The piece then should be folded in half with right the sides together. The piece then sewn together at the top opening leaving the bottom or the piece open.

Now the hood is ready for assembling to the body piece. Join the bottom opening part along the neck edge with right sides together. Each corner of the opening should be place at the center front of the neck or as per instruction.

Thanks for visiting and questioning.
Have a wonderful day!

Ratcha

Click here to add your own comments

Join in and write your own comment! It's easy to do. How? Simply click here to return to Knitting Questions And Comments.

spring banner

Samia Yarn from Knit Picks
notesheetpackage2


Enjoy this page? Please pay it forward. Here's how...

Would you prefer to share this page with others by linking to it?

  1. Click on the HTML link code below.
  2. Copy and paste it, adding a note of your own, into your blog, a Web page, forums, a blog comment, your Facebook account, or anywhere that someone would find this page valuable.